การดู : 221
07/06/2026 06:43น.
EP.82 การใช้งาน WebSocket ในระบบติดตามสถานะ (Real-time Status Tracking)
#WebSocket
#Go
#Golang
#ระบบแจ้งเตือน
#Real-time
ใน EP.82 นี้เราจะพาคุณมาดูวิธีสร้างระบบติดตามสถานะแบบเรียลไทม์ (Real-time Status Tracking) ด้วย Go และ WebSocket ซึ่งเหมาะอย่างยิ่งสำหรับการ:
- ติดตามสถานะของผู้ใช้
- เฝ้าระวังเซิร์ฟเวอร์
- ตรวจสอบสถานะของอุปกรณ์ IoT
ทุกการเปลี่ยนแปลงจะถูกส่งไปยังผู้ใช้ทันที โดยไม่ต้องรอ refresh หรือ polling ทำให้ระบบมี latency ต่ำ และตอบสนองแบบเรียลไทม์
🔍 ทำไมต้องใช้ WebSocket ในระบบ Status Tracking?
ระบบติดตามสถานะต้อง รวดเร็ว และ ต่อเนื่อง การใช้ WebSocket ช่วยให้:
- ✳️ เชื่อมต่อแบบ persistent (ไม่ต้องเปิด/ปิด request ใหม่ทุกครั้ง)
- ✳️ ส่งข้อมูลสองทางทันที จาก server → client
- ✳️ ลดการใช้ทรัพยากร เทียบกับการ polling ซ้ำ ๆ
✅ โครงสร้างระบบพื้นฐาน
graph LR
A[Data Source<br>(DB, Sensor, etc.)] --> B[WebSocket Server<br>(Golang)]
B --> C[Client<br>(Web/Mobile)]
- Data Source: แหล่งข้อมูลที่เปลี่ยนแปลงสถานะ
- WebSocket Server: ตรวจจับและส่งการเปลี่ยนแปลงไปยัง client
- Client: แสดงสถานะล่าสุดแบบทันที
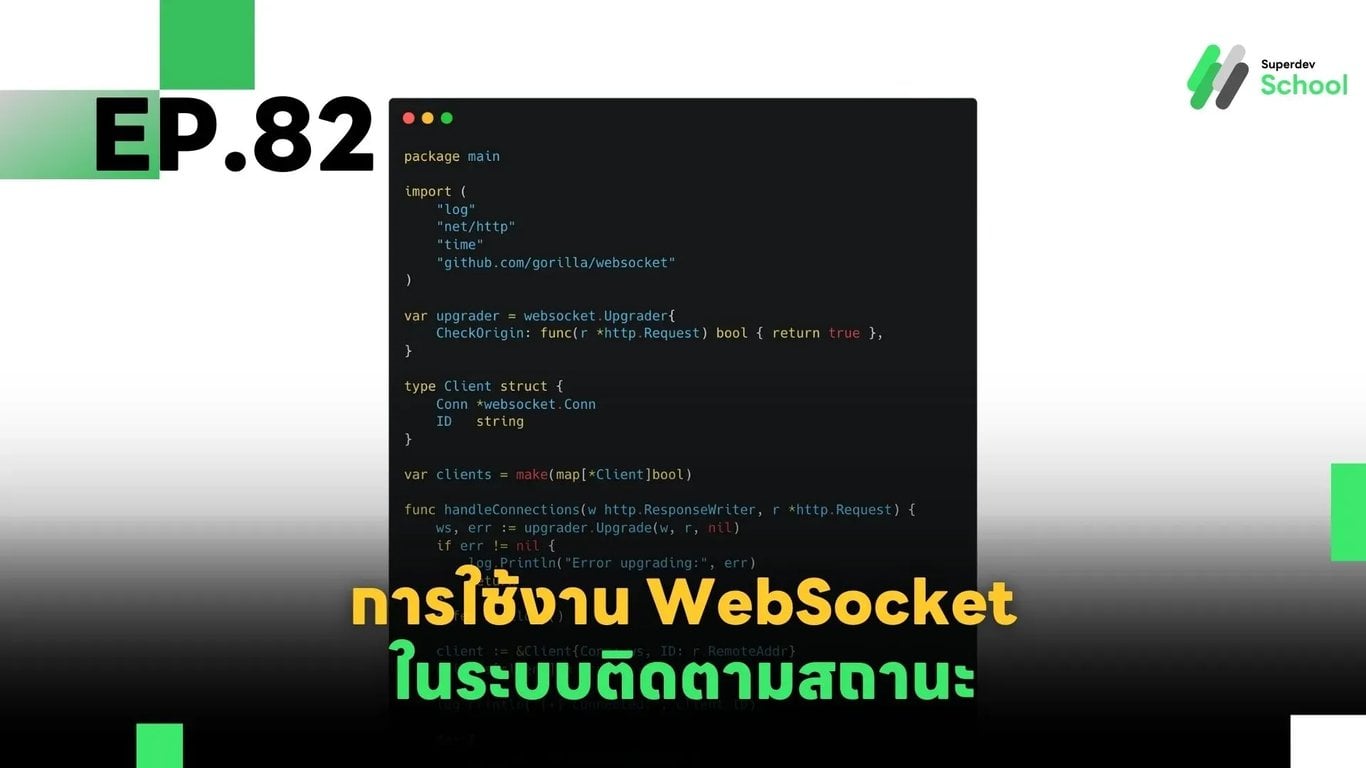
📦 ตัวอย่างโค้ด WebSocket Server
package main

import (
    "log"
    "net/http"
    "time"
    "github.com/gorilla/websocket"
)

var upgrader = websocket.Upgrader{
    CheckOrigin: func(r *http.Request) bool { return true },
}

type Client struct {
    Conn *websocket.Conn
    ID   string
}

var clients = make(map[*Client]bool)

func handleConnections(w http.ResponseWriter, r *http.Request) {
    ws, err := upgrader.Upgrade(w, r, nil)
    if err != nil {
        log.Println("Error upgrading:", err)
        return
    }
    defer ws.Close()

    client := &Client{Conn: ws, ID: r.RemoteAddr}
    clients[client] = true

    log.Println("[+] Connected:", client.ID)

    for {
        _, _, err := ws.ReadMessage()
        if err != nil {
            log.Println("[-] Disconnected:", client.ID)
            delete(clients, client)
            break
        }
    }
}

func broadcastStatus() {
    for {
        statusUpdate := map[string]interface{}{
            "timestamp": time.Now().Format(time.RFC3339),
            "status":    "active",
        }

        for client := range clients {
            err := client.Conn.WriteJSON(statusUpdate)
            if err != nil {
                log.Println("[x] Send error to", client.ID, ":", err)
                client.Conn.Close()
                delete(clients, client)
            }
        }

        time.Sleep(5 * time.Second)
    }
}

func main() {
    http.HandleFunc("/ws", handleConnections)
    go broadcastStatus()

    log.Println("🚀 WebSocket server running on :8080")
    err := http.ListenAndServe(":8080", nil)
    if err != nil {
        log.Fatal("Server error:", err)
    }
}
🔎 สิ่งที่โค้ดนี้ทำ:
| ฟังก์ชัน | หน้าที่ |
|---|---|
handleConnections | จัดการการเชื่อมต่อใหม่ เพิ่ม client เข้า map และรอ read message |
broadcastStatus | ส่งข้อมูล JSON ไปยัง client ทุก ๆ 5 วินาที |
main | เริ่มต้น WebSocket server และ run background task |
🧠 แนวทางปรับปรุงสำหรับ Production
| Feature | คำอธิบาย |
|---|---|
| ✅ ใช้ channel หรือ observer pattern | เพื่อส่งข้อมูลทันทีเมื่อมีการเปลี่ยนแปลง แทน broadcast timer |
| ✅ ใช้ Redis Pub/Sub หรือ Kafka | สำหรับ scale หลาย instance |
| ✅ Heartbeat & Reconnect | ตรวจจับการตัดการเชื่อมต่อและเชื่อมใหม่อัตโนมัติ |
| ✅ Session management | จัดการสถานะของ client, login, filter group |
🚀 ท้าให้ลอง!
- สร้างระบบติดตามผู้ใช้หลายคนพร้อมกัน และแยกการส่งข้อมูลเฉพาะกลุ่ม
- ผูก WebSocket กับข้อมูลจากฐานข้อมูลที่เปลี่ยนแปลงแบบ real-time (เช่น Redis Stream)
- เขียน UI แสดง status dashboard สด ๆ แบบที่ใช้ใน control room หรือ admin panel
🔜 EP ถัดไป:
EP.83 การใช้ WebSocket สร้างแอปพลิเคชันแบบ Collaborative
เช่น ระบบแก้เอกสารพร้อมกันหลายคน, whiteboard, หรือ team chat พร้อมกันแบบเรียลไทม์
อ่านบทความ Series อื่นๆ
🔵 Facebook: Superdev School (Superdev)
📸 Instagram: superdevschool
🎬 TikTok: superdevschool
🌐 Website: www.superdev.school