View : 252
07/06/2026 06:44am
EP.50 Adding Edit Messages Feature in WebSocket Chat
#Chat UX
#Persistent Chat
#Modify Messages
#WebSocket API
#Real-Time Chat
#Golang
#Go
#WebSocket
#Edit Messages
Why Have an Edit Messages Feature in WebSocket Chat?
The Edit Messages feature allows users to modify messages they have already sent, offering several benefits:
- Typo Correction: Users can correct spelling or grammatical errors in their messages.
- Clarifying Meaning: Users can improve the clarity or intent of their previous messages.
- Enhanced Conversation Efficiency: Provides a smoother communication flow by allowing corrections.
Structure of the Edit Messages System in WebSocket Chat
- WebSocket Server: Manages message edits from the database and notifies all connected clients.
- Database (PostgreSQL / MongoDB): Stores the edited messages.
- Frontend (Client-Side): Displays the edit message button in the UI and updates results in real-time.
Adding the Edit Messages Feature to the WebSocket Server
1. Update the Database to Support Message Editing
File: schema.sql
ALTER TABLE chat_messages ADD COLUMN edited BOOLEAN DEFAULT FALSE;2. Adding Code to Edit Messages in the WebSocket Server
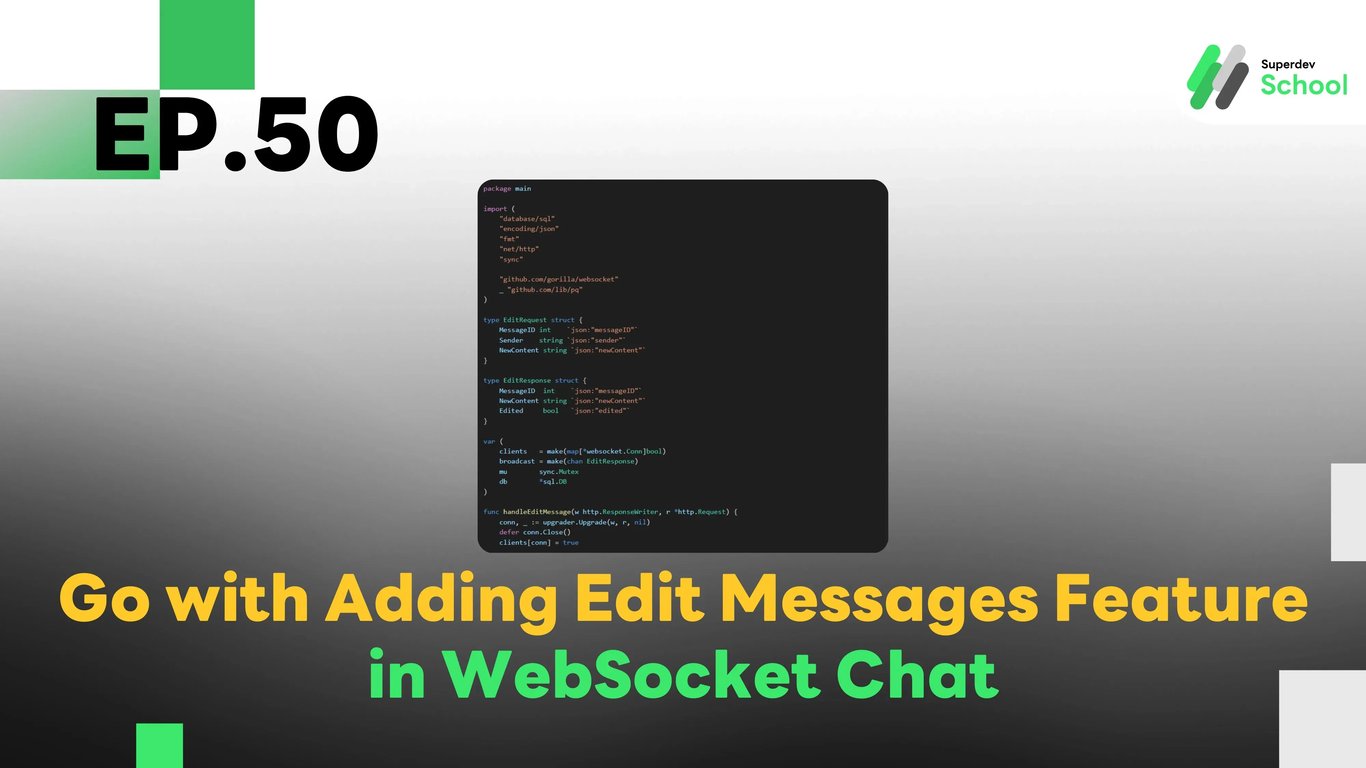
File: websocket_server.go
package main

import (
    "database/sql"
    "encoding/json"
    "fmt"
    "net/http"
    "sync"

    "github.com/gorilla/websocket"
    _ "github.com/lib/pq"
)

type EditRequest struct {
    MessageID int    `json:"messageID"`
    Sender    string `json:"sender"`
    NewContent string `json:"newContent"`
}

type EditResponse struct {
    MessageID  int    `json:"messageID"`
    NewContent string `json:"newContent"`
    Edited     bool   `json:"edited"`
}

var (
    clients   = make(map[*websocket.Conn]bool)
    broadcast = make(chan EditResponse)
    mu        sync.Mutex
    db        *sql.DB
)

func handleEditMessage(w http.ResponseWriter, r *http.Request) {
    conn, _ := upgrader.Upgrade(w, r, nil)
    defer conn.Close()
    clients[conn] = true

    for {
        var request EditRequest
        err := conn.ReadJSON(&request)
        if err != nil {
            delete(clients, conn)
            break
        }

        _, err = db.Exec("UPDATE chat_messages SET content = $1, edited = TRUE WHERE id = $2 AND sender = $3", request.NewContent, request.MessageID, request.Sender)
        if err == nil {
            broadcast <- EditResponse{MessageID: request.MessageID, NewContent: request.NewContent, Edited: true}
        }
    }
}

func notifyClients() {
    for {
        msg := <-broadcast
        for client := range clients {
            err := client.WriteJSON(msg)
            if err != nil {
                client.Close()
                delete(clients, client)
            }
        }
    }
}

func main() {
    http.HandleFunc("/ws", handleEditMessage)
    go notifyClients()
    fmt.Println("WebSocket Server Running on Port 8080")
    http.ListenAndServe(":8080", nil)
}
3. Adding an Edit Message Button in the Frontend (Client-Side)
File: client.js
const socket = new WebSocket("ws://localhost:8080/ws");
const chatContainer = document.getElementById("chat-container");

socket.onmessage = (event) => {
    const data = JSON.parse(event.data);
    if (data.edited) {
        document.getElementById(`msg-${data.messageID}`).innerText = `${data.newContent} (Edited)`;
    }
};

function sendEditRequest(messageID, newContent) {
    socket.send(JSON.stringify({ messageID, sender: "JohnDoe", newContent }));
}

function displayMessage(id, sender, content) {
    const msgElement = document.createElement("p");
    msgElement.id = `msg-${id}`;
    msgElement.innerText = `${sender}: ${content}`;

    const editButton = document.createElement("button");
    editButton.innerText = "Edit";
    editButton.onclick = () => {
        const newContent = prompt("Edit your message:", content);
        if (newContent) sendEditRequest(id, newContent);
    };

    msgElement.appendChild(editButton);
    chatContainer.appendChild(msgElement);
}
Displaying the Edit Message Button on the UI
File: index.html
<div id="chat-container"></div>4. Testing the System
- Running the WebSocket Server
go run websocket_server.go- Open the Web Page and Try Typing a Message
- Click the Edit Message Button and Observe Results on the UI
Challenge!
Try adding an Edit Timeout feature that allows users to edit messages only within a specified time frame. This will help maintain the integrity of conversations while still providing flexibility for corrections.