07/06/2026 06:43am
EP.117 Connecting Multiple IoT Devices with WebSocket (Real-time IoT Network)
#Real-time System
#IoT
#Golang
#WebSocket
#Go
Modern IoT systems no longer consist of just a single device. Instead, they involve hundreds or thousands of devices working in parallel, such as:
- Temperature & humidity sensors
- Smart home devices
- Industrial machines and robots
- GPS trackers and vehicle monitoring systems
All of them require real-time, stable, energy-efficient, and secure communication.
Why WebSocket is Ideal for IoT?
WebSocket is one of the most effective technologies for real-time IoT communication, because it offers:
✅ Persistent connection with continuous data transfer
✅ Ultra-low latency (milliseconds)
✅ Bandwidth efficiency
✅ Full-duplex communication (two-way)
🧱 1. Real-time IoT Architecture Using WebSocket
A typical real-time IoT system consists of four core components:
1) IoT Device (Client)
Could be a sensor, ESP32, Raspberry Pi, or even a mobile app. These devices initiate the WebSocket connection.
2) WebSocket Gateway (Server)
Responsible for:
- Authenticating devices
- Receiving and sending sensor data
- Forwarding data to a database or message broker
- Broadcasting real-time updates to a dashboard
3) Message Broker / Data Stream Layer
Such as Redis Pub/Sub, Kafka, or NATS used to route sensor data to multiple services in parallel.
4) Monitoring Dashboard
A real-time dashboard to monitor device data (e.g., a screen showing machine statuses in a factory).
🔐 2. Device Authentication (Security First!)
Security is the top priority in IoT. Each device must be authenticated properly.
Common techniques:
✅ Device Token
Assign a unique token for each device:
{
  "device_id": "SENSOR-01",
  "device_secret": "98asdh9283dj29"
}
✅ JWT with Device ID
More suitable for large-scale IoT platforms.
✅ IP Whitelisting
Used in closed networks (e.g., factories, labs).
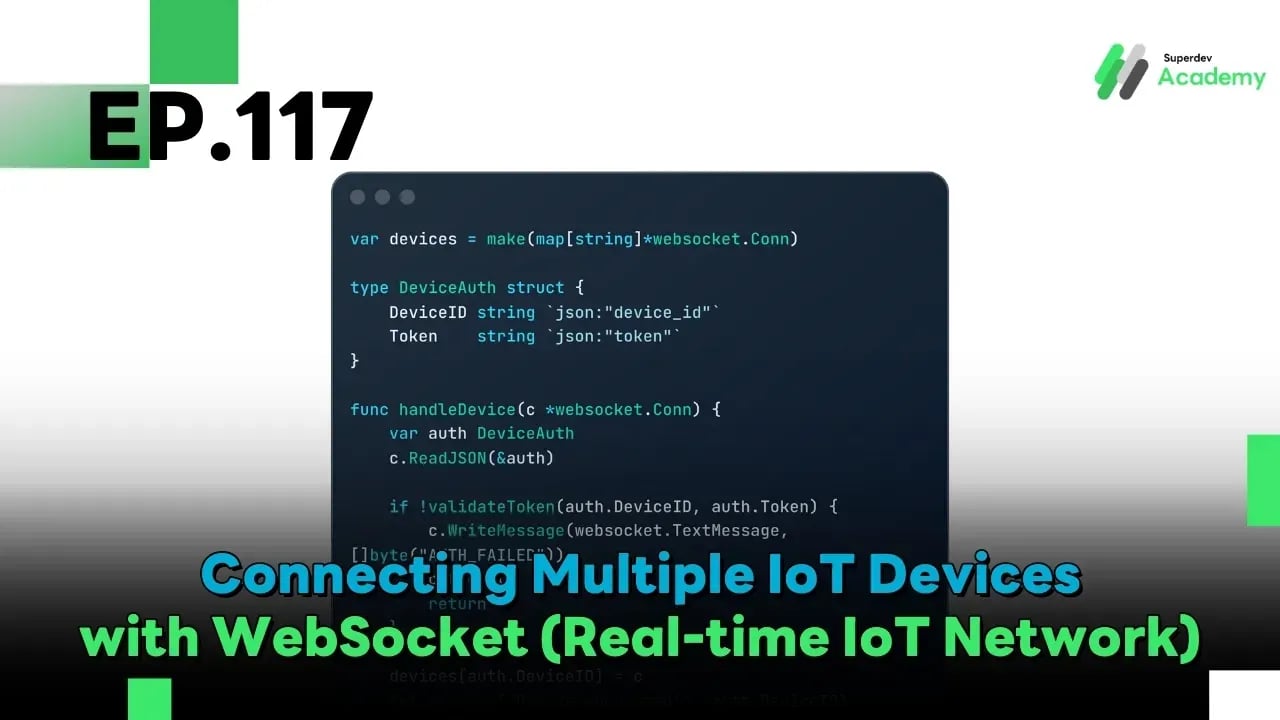
📡 3. Device-to-Connection Mapping (Server Side)
You need to map each device to its WebSocket connection:
var devices = make(map[string]*websocket.Conn)

type DeviceAuth struct {
    DeviceID string `json:"device_id"`
    Token    string `json:"token"`
}

func handleDevice(c *websocket.Conn) {
    var auth DeviceAuth
    c.ReadJSON(&auth)

    if !validateToken(auth.DeviceID, auth.Token) {
        c.WriteMessage(websocket.TextMessage, []byte("AUTH_FAILED"))
        c.Close()
        return
    }

    devices[auth.DeviceID] = c
    fmt.Println("Device connected:", auth.DeviceID)
}
📊 4. Real-time Sensor Data Transmission
Example of sensor payload:
{
  "device_id": "TEMP-01",
  "temperature": 26.5,
  "humidity": 80
}
Server-side Go code to listen and broadcast:
type SensorData struct {
    DeviceID    string  `json:"device_id"`
    Temperature float64 `json:"temperature"`
    Humidity    float64 `json:"humidity"`
}

func listenDevice(deviceID string, conn *websocket.Conn) {
    for {
        var data SensorData
        if err := conn.ReadJSON(&data); err != nil {
            delete(devices, deviceID)
            return
        }

        broadcastToDashboard(data)
    }
}
🔄 5. Bandwidth Management (Prevent Server Overload)
Some sensors send data every 100ms this can easily overwhelm your system.
Techniques to manage this:
✅ Rate Limiting per Device
Example: Max 10 messages per second.
✅ Message Aggregation
Combine multiple data points into one message.
✅ Adaptive Data Rate
Increase frequency only on abnormal values; reduce when values are stable.
✅ Compression
Use GZIP or Protocol Buffers (Protobuf) to reduce payload size.
🖥 6. Dashboard Listener Example (WebSocket Client in Go)
func dashboardListener() {
    conn, _, err := websocket.DefaultDialer.Dial("ws://localhost:8080/dashboard", nil)
    if err != nil { panic(err) }

    for {
        _, msg, _ := conn.ReadMessage()
        fmt.Println("New Sensor Update:", string(msg))
    }
}
📈 7. Scaling to Support 10,000+ Devices
To scale your IoT system properly, use the following techniques:
✅ Horizontal Scaling
Run multiple WebSocket instances.
✅ Redis Pub/Sub
Sync messages between instances.
✅ Kubernetes + HPA
Automatically scale based on system load.
✅ Sharding Devices
Divide devices into groups (e.g., shard-01, shard-02, etc.).
🧪 Test It Yourself!
Try building a mini IoT demo:
- Simulate a device using Go or ESP32 that sends temperature data every second
- WebSocket Server receives and stores the data
- Dashboard shows real-time data updates
- Add alert logic when temperature exceeds a threshold
This is the foundation of Smart Homes, Smart Factories, and Smart Agriculture systems!
🔮 Next Episode AI + WebSocket for IoT
In EP.118, we’ll teach you how to build an AI-powered WebSocket system for IoT!
You’ll learn:
- Real-time anomaly detection
- Predictive maintenance using ML
- Automatic alert generation via WebSocket
If you complete this you’re on your way to becoming a real-time system pro. 🎯 See you in the next episode!