07/06/2026 06:43am
Git for Beginners: Visual Guide to Add, Commit, and Push (No Memorizing Needed)
#Git
#Git Workflow
#Git tutorial
#Git for beginners
In the world of modern software development, there is a saying: "No matter how good you are at coding, if you don't know how to use Git, you can't work with anyone." This statement is not an exaggeration. Git is the global standard that over 96% of developers worldwide use to manage their projects.
If you are still stuck in the cycle of copying folders and naming them Project_Final_V1, V2, and so on, this article will pull you out of that loop and launch you into a professional workflow with Git—all in one read.
What is Git? (More than just file storage)
Git is a Distributed Version Control System (DVCS).
In the past, version control systems were usually "Centralized," meaning they relied on a single server. If the server went down, everyone stopped working. However, Git was designed by Linus Torvalds (the creator of Linux) to allow every developer’s machine to have a "full history of all edits." This allows us to work offline and provides much higher security.
Technical Insight: Snapshots vs. Deltas
Legacy version control systems often stored data as Deltas (only saving the differences between versions). But Git uses the concept of Snapshots. Every time you save (Commit), Git captures the overall image of all files at that moment, much like taking a "photo." This makes rolling back to old versions incredibly fast because Git doesn't have to calculate differences from the past.
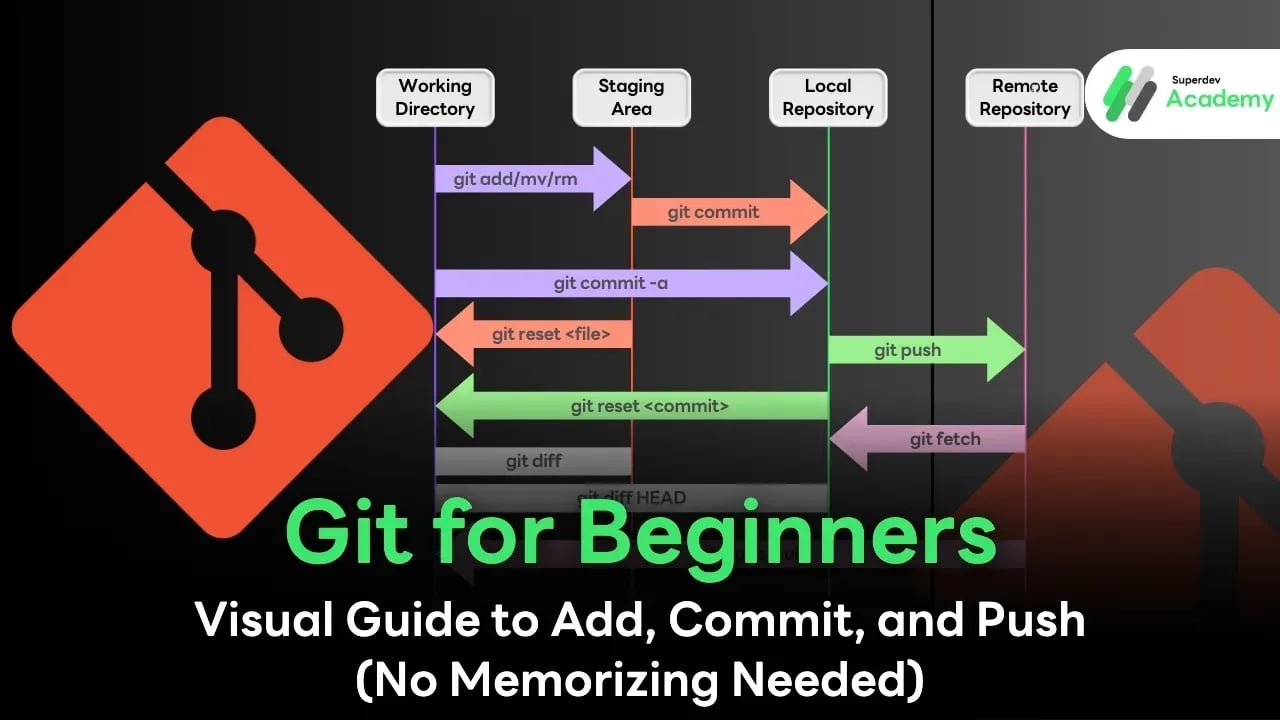
Deep Dive into the 4 Danger Zones (The 4 Stages Workflow)
The main reason people get confused with Git is not knowing "Where is my file right now?" Imagine the process of "Packing goods for export" as follows:
Zone 1: Working Directory (The Untidy Space)
This is the folder on your machine where you write code. Everything here is "not yet safe." If you accidentally delete a file or your computer crashes, your code is gone forever.
Zone 2: Staging Area (The Inspection Point)
Think of this as a "conveyor belt" before the final save. You must first select which files are "ready." This allows you to separate finished features from those that are still work-in-progress.
Zone 3: Local Repository (The Private Warehouse)
When you save (Commit), files move from the conveyor belt into a hidden database called the .git folder on your machine. Your code is now safe! You can time travel back to this point whenever you want.
Zone 4: Remote Repository (The Export Port)
This involves taking the code from your machine and uploading it to a central server like GitHub, GitLab, or Bitbucket for your teammates to pull and use, or to back up your data on the Cloud.
3 Sacred Commands: Memorize the Action, Understand the Root
Let’s look at how to use these commands through the Terminal or Command Line, just like professional developers do.
Step 1: git add (Picking items into the box)
Once you have finished editing your code, select the files you want to save.
Bash
# Select only specific files
git add index.html

# Or select all modified files in the folder
git add .
Step 2: git commit (Sealing the crate and recording history)
This is like creating a "Save Point" in a game. You must include a "Message" to describe what this crate contains.
Bash
# Save with an explanatory message (It must be meaningful!)
git commit -m "feat: add login button on home page"
Behind the scenes: Git will generate a long ID (SHA-1 Hash) to serve as the unique identification number for this specific version.
Step 3: git push (Exporting to the world)
Send what you have recorded on your machine up to the central server.
Bash
# Push code to the 'main' branch on the server
git push origin main
Essential Commands for Daily Use
Beyond the three main commands, these are the tools you simply cannot live without:
git status (The Compass)
Use this to check which files have been modified and which zone they are currently in.
Bash
git status
git log (The History Book)
View a list of all the commits you have ever made.
Bash
git log --oneline
git pull (The Update)
Pull the latest work from your teammates down to your machine.
Bash
git pull origin main
Security in the World of Git
A common mistake for beginners is accidentally pushing API Keys or sensitive passwords to a Public Repository (a public space).
In P’Boom’s video, he shares an example of a leaked Gemini key that could have resulted in millions in damages! Therefore, before every git add, don’t forget to use a .gitignore file to prevent your secrets from leaking out.
Daily Essential Commands for Every Developer
Best Practices: How to Use Git Like a Pro
Atomic Commits: Don’t wait until the entire project is finished to commit everything at once. Break your work into small, logical units—for example, 1 bug fix = 1 commit. This makes it much easier to revert changes if something goes wrong.
Write Human-Readable Messages: Avoid vague messages like update, fix, or asdasd. Instead, use the format [Type]: [Details], such as fix: resolve non-responsive login button on the checkout page.
Use .gitignore: Never push unnecessary files to Git, such as the node_modules folder, sensitive .env password files, or temporary system files.
Conclusion
Starting with Git might feel like a headache at first because of the unfamiliar terminology. However, if you understand the 4 Zones and the 3 Main Steps (Add -> Commit -> Push), you will realize that Git is your best friend. It allows you to work with peace of mind no more fear of losing code or clashing with your teammates ever again.
Learn More: If you enjoyed this visual guide, don’t forget to follow our "Git The Series" by P’Boom from Superdev Academy on YouTube. You’ll get to practice with real-world GUI tools and master advanced industry techniques!