07/06/2026 06:44am
EP.66 Using Golang with JSON Web Tokens (JWT) for Authentication
#Golang JWT authentication
#WebSocket Authentication
#JWT token Golang
#WebSocket user login
#WebSocket server authentication
In EP.66, we will explore how to implement JSON Web Tokens (JWT) in Golang for creating an authentication system in WebSocket Chat. Using JWT enables us to create a secure and scalable way of managing user authentication, without the need to store session data on the server. This also helps in preventing security issues like session hijacking and CSRF attacks.
JWT is a widely used method to handle authentication in modern web applications, including chat systems where users need to be validated securely before they can interact in real-time.
Why Use JWT for Authentication in WebSocket Chat?
Using JWT for authentication comes with several benefits:
- Security: JWT eliminates the need to store session data on the server and allows user validation without compromising security.
- Ease of use: JWT makes it easy to verify user identities in real-time applications like WebSocket chat.
- Scalable: JWT works well with APIs and can be easily integrated across multiple services, ensuring consistent authentication across different parts of your application.
Advantages of Using JWT in WebSocket Chat:
- Secure user authentication: JWT ensures that only validated users can join the chat.
- Easy access control: JWT can store user roles and permissions to determine what actions they are allowed to perform in the chat.
- Reduced attack surface: By eliminating session cookies, JWT reduces the risk of session hijacking and other types of attacks.
Structure of JWT Authentication System in WebSocket Chat
In the WebSocket chat system, the JWT will be used to authenticate users before they can join the chat. The server will issue a JWT when the user logs in, and this token will be used to verify the user's identity for every WebSocket connection.
Key Components of JWT Authentication System:
- JWT Token creation upon login:
When the user logs in, the system creates a JWT Token and sends it back to the user. - Token verification on WebSocket connection:
When a user connects to the WebSocket server, the system will verify the JWT Token to authenticate the user. - Access control using JWT:
After authentication, the system uses the JWT to check the user’s roles and permissions, ensuring they have the right access to specific features in the chat room.
Implementing JWT Authentication in WebSocket Server
Steps to Implement:
- Create JWT Token upon User Login:
- We will create a JWT when the user logs in, containing the user’s identity and expiration time.
- Verify JWT Token upon WebSocket Connection:
- When the user connects to the WebSocket server, the server will verify the JWT Token to authenticate the user.
- Access Control:
- After verifying the JWT, the system will use the token’s payload to manage access and user permissions in the chat.
Example Code for JWT Authentication in WebSocket Server
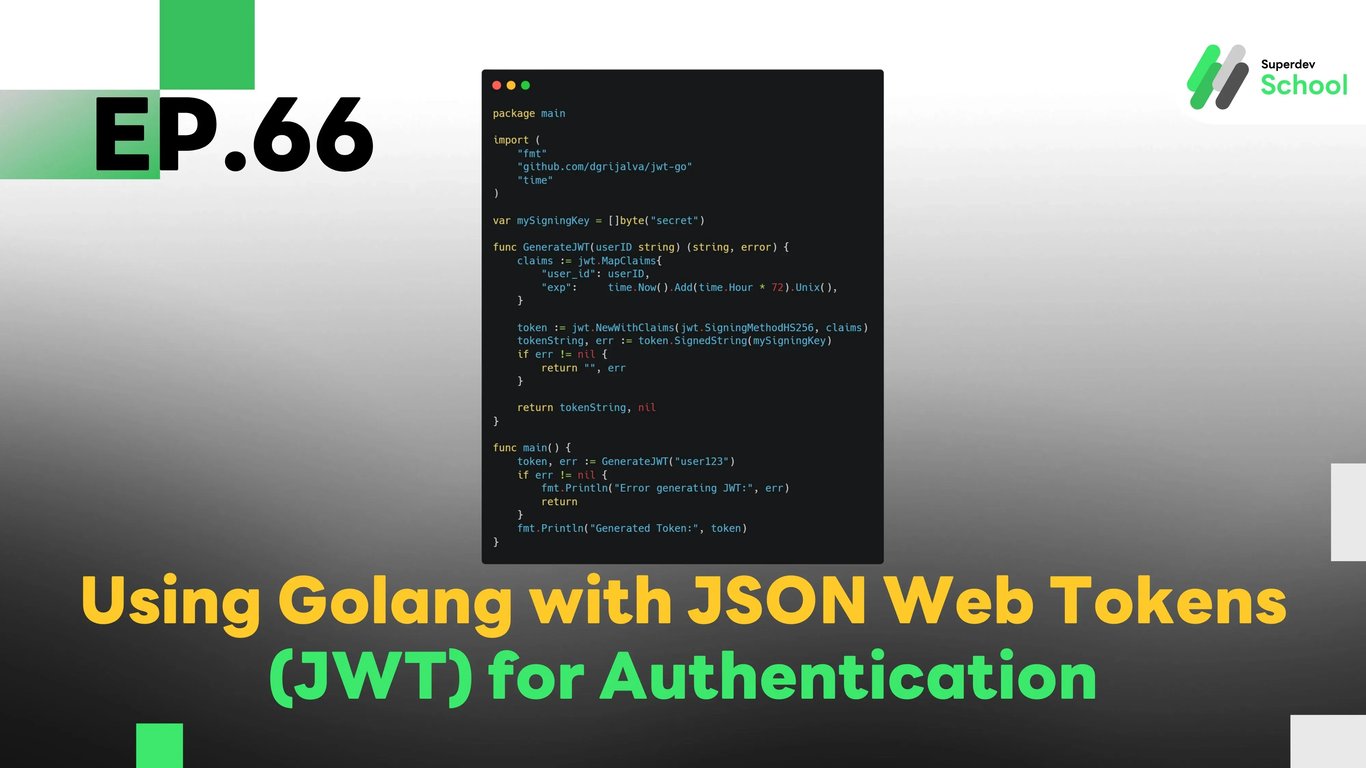
Creating JWT Token upon User Login
package main

import (
    "fmt"
    "github.com/dgrijalva/jwt-go"
    "time"
)

var mySigningKey = []byte("secret")

func GenerateJWT(userID string) (string, error) {
    claims := jwt.MapClaims{
        "user_id": userID,
        "exp":     time.Now().Add(time.Hour * 72).Unix(),
    }

    token := jwt.NewWithClaims(jwt.SigningMethodHS256, claims)
    tokenString, err := token.SignedString(mySigningKey)
    if err != nil {
        return "", err
    }

    return tokenString, nil
}

func main() {
    token, err := GenerateJWT("user123")
    if err != nil {
        fmt.Println("Error generating JWT:", err)
        return
    }
    fmt.Println("Generated Token:", token)
}
Verifying JWT Token upon WebSocket Connection
package main

import (
    "fmt"
    "github.com/dgrijalva/jwt-go"
    "log"
    "net/http"
    "github.com/gorilla/websocket"
)

var mySigningKey = []byte("secret")

func validateJWT(tokenString string) (*jwt.Token, error) {
    token, err := jwt.Parse(tokenString, func(token *jwt.Token) (interface{}, error) {
        if _, ok := token.Method.(*jwt.SigningMethodHMAC); !ok {
            return nil, fmt.Errorf("Unexpected signing method: %v", token.Header["alg"])
        }
        return mySigningKey, nil
    })
    if err != nil {
        return nil, err
    }
    return token, nil
}

func handleConnection(w http.ResponseWriter, r *http.Request) {
    tokenString := r.URL.Query().Get("token") // Get token from URL query string
    token, err := validateJWT(tokenString)
    if err != nil || !token.Valid {
        http.Error(w, "Invalid token", http.StatusUnauthorized)
        return
    }

    conn, err := websocket.Upgrade(w, r, nil)
    if err != nil {
        log.Println("Error upgrading connection:", err)
        return
    }

    defer conn.Close()
    fmt.Println("User authenticated and connected")
}

func main() {
    http.HandleFunc("/ws", handleConnection)
    log.Fatal(http.ListenAndServe(":8080", nil))
}
In this code example, the server creates a JWT Token when the user logs in and verifies the JWT Token when the user connects to the WebSocket server.
Testing JWT Authentication System
After implementing JWT authentication, it’s important to test the system to ensure it works as expected.
Tests to conduct:
- Test token creation and sending:
Ensure that the JWT is created and sent to the user upon login. - Test token verification:
Ensure that the WebSocket server verifies the JWT Token correctly during the connection. - Test access control:
Ensure that the system uses the JWT Token to grant or deny access to specific features based on user roles.
Challenge!
Try adding JWT token refresh functionality so users don’t need to log in again when their token expires.
Next EP:
In EP.67, we will explore Creating an Audit Log System in WebSocket Server to track actions and events in your WebSocket Server, helping you monitor and review server activity efficiently!