View : 233
07/06/2026 06:44am
EP.42 Adding Read Receipts Feature in WebSocket Chat
#Chat UX
#Chat Features
#Message Read Status
#WebSocket API
#Real-Time Chat
#Golang
#Go
#WebSocket
#Read Receipts
Why Have Read Receipts in WebSocket Chat?
Read Receipts are an essential feature that helps users understand:
- Whether the messages they sent have been read by the recipient.
- Provides senders with confidence that their messages are not being overlooked.
- Enhances the real-time communication experience.
Examples of applications that use Read Receipts include WhatsApp, Messenger, and LINE which display checkmarks or special icons when messages are read.
Structure of the Read Receipts System in WebSocket Chat
- WebSocket Server: Receives and sends "read" status to users in the chat.
- Database: Stores the message status (unread/read).
- Frontend (Client-Side): Updates the UI when messages are read.
Adding the Read Receipts Feature to the WebSocket Server
1. Upgrade the WebSocket Server to Support Read Receipts
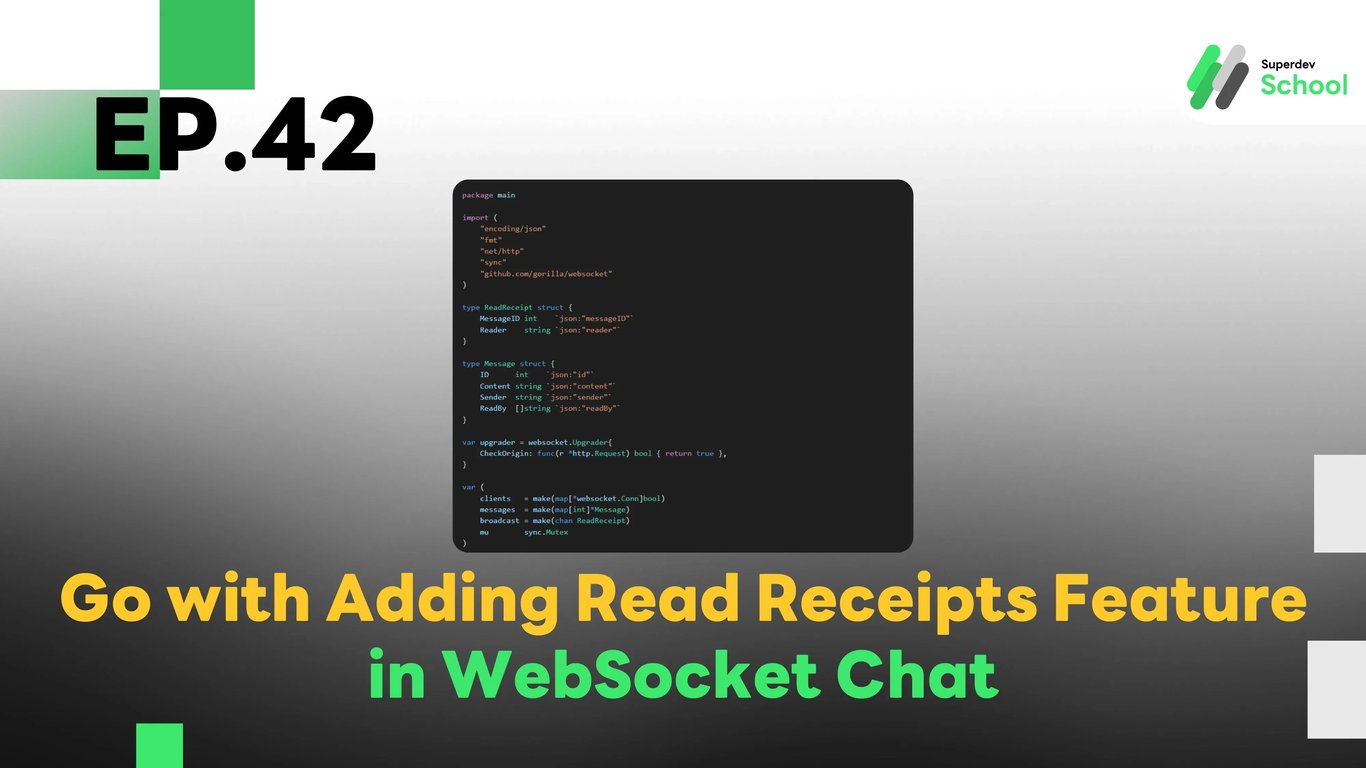
File: websocket_server.go
package main

import (
    "encoding/json"
    "fmt"
    "net/http"
    "sync"
    "github.com/gorilla/websocket"
)

type ReadReceipt struct {
    MessageID int    `json:"messageID"`
    Reader    string `json:"reader"`
}

type Message struct {
    ID      int    `json:"id"`
    Content string `json:"content"`
    Sender  string `json:"sender"`
    ReadBy  []string `json:"readBy"`
}

var upgrader = websocket.Upgrader{
    CheckOrigin: func(r *http.Request) bool { return true },
}

var (
    clients   = make(map[*websocket.Conn]bool)
    messages  = make(map[int]*Message)
    broadcast = make(chan ReadReceipt)
    mu        sync.Mutex
)

func handleConnections(w http.ResponseWriter, r *http.Request) {
    conn, _ := upgrader.Upgrade(w, r, nil)
    defer conn.Close()
    clients[conn] = true

    for {
        var receipt ReadReceipt
        err := conn.ReadJSON(&receipt)
        if err != nil {
            delete(clients, conn)
            break
        }
        broadcast <- receipt
    }
}

func handleMessages() {
    for {
        receipt := <-broadcast
        mu.Lock()
        if msg, exists := messages[receipt.MessageID]; exists {
            msg.ReadBy = append(msg.ReadBy, receipt.Reader)
        }
        mu.Unlock()

        for client := range clients {
            err := client.WriteJSON(receipt)
            if err != nil {
                client.Close()
                delete(clients, client)
            }
        }
    }
}

func main() {
    http.HandleFunc("/ws", handleConnections)
    go handleMessages()
    fmt.Println("WebSocket Server Running on Port 8080")
    http.ListenAndServe(":8080", nil)
}
2. Adding Read Receipts in the Frontend (Client-Side)
File: client.js
const socket = new WebSocket("ws://localhost:8080/ws");
const messagesContainer = document.getElementById("messages");

socket.onmessage = (event) => {
    const data = JSON.parse(event.data);
    if (data.messageID) {
        document.getElementById(`msg-${data.messageID}`).innerText += " ✔ Read";
    }
};

function sendReadReceipt(messageID) {
    socket.send(JSON.stringify({ messageID, reader: "JohnDoe" }));
}

function displayMessage(id, content) {
    const msgElement = document.createElement("p");
    msgElement.id = `msg-${id}`;
    msgElement.innerText = content;
    msgElement.onclick = () => sendReadReceipt(id);
    messagesContainer.appendChild(msgElement);
}
Displaying Read Receipts on the UI
File: index.html
<div id="messages"></div>3. Testing the System
Run the WebSocket Server
go run websocket_server.go- Open Multiple Browser Tabs and Send Messages
- Click on Messages to Send Read Status
Challenge!
Try adding Push Notifications for Read Receipts to notify the sender immediately when their message has been read. This will enhance user engagement and provide instant feedback.
Next EP
In EP.43, we will add a Pinned Messages feature in the WebSocket Chat! 🚀