07/06/2026 06:44am
EP.63 User Permissions Management in WebSocket Chat
#WebSocket chat room management
#Role-based access control
#WebSocket user management
#WebSocket app development
In EP.63, we will discuss how to build a User Permissions Management system in WebSocket Chat. This system allows us to define permissions for users within each chat room, such as granting permission to send messages, assigning admin privileges, or restricting certain actions within the chat room.
User permissions management is crucial for controlling security and operations in a real-time chat environment. This system enables chat room administrators to control actions within the chat, improve security, and keep conversations organized.
Why is User Permissions Management Important in WebSocket Chat?
User Permissions Management helps the chat room administrator to:
- Control access: Define who can join the chat room.
- Manage actions: Admins can define which users can send messages, delete messages, or ban users.
- Increase security: Restrict users from performing inappropriate actions within the chat.
- Add flexibility: Admins can create chat rooms with better user access control.
Benefits of User Permissions Management:
- Clear control over chat rooms: Admins can define what activities a user can perform in the chat room.
- Prevents inappropriate behavior: Permissions management prevents unauthorized users from taking inappropriate actions.
- Adjusts the chat room for user roles: Admins can ensure regular users cannot send messages in certain chat rooms.
Structure of User Permissions Management in WebSocket Chat
User permissions management requires a structure that stores permission data and transmits it to users in real-time.
Key components of the User Permissions Management system:
- Storing user permissions in the database:
- Storing data regarding who can access the chat room, send messages, ban members, etc.
- Permission validation:
- When a user connects or sends a message, the system must verify the user's permissions before allowing actions.
- Sending permission data to users:
- Upon joining a chat room, the system immediately sends the user's permissions to them.
Adding User Permissions Management Features in WebSocket Server
Adding user permissions management features in the WebSocket Server can be done by updating the code to handle user permissions during each connection.
Steps to implement:
- Update the WebSocket Server:
- Add a function to check the user's permissions before allowing them to send messages or join a chat room.
- Store permissions in the database:
- Add a column in the database to store user permission data.
- Send permission data to users:
- Send the user's permissions to them in real-time as they join the chat room.
Building UI for User Permissions Management
A UI for managing user permissions will allow chat room admins to easily set and manage user permissions within the chat.
UI Components:
- Buttons for room management:
- For example, buttons to add or remove members from the chat room.
- Displaying user permissions:
- Show whether a user is an admin or their ability to send messages.
- User banning:
- A button to ban users who are acting inappropriately.
Testing User Permissions Management System
After developing the user permissions management system, it’s essential to test the system to ensure each feature works correctly.
Tests to conduct:
- Testing room member management:
- Test adding and removing members from the chat room.
- Testing permission validation:
- Test whether users can perform actions according to their permissions.
- Testing user banning:
- Test whether admins can ban users correctly.
Code Example:
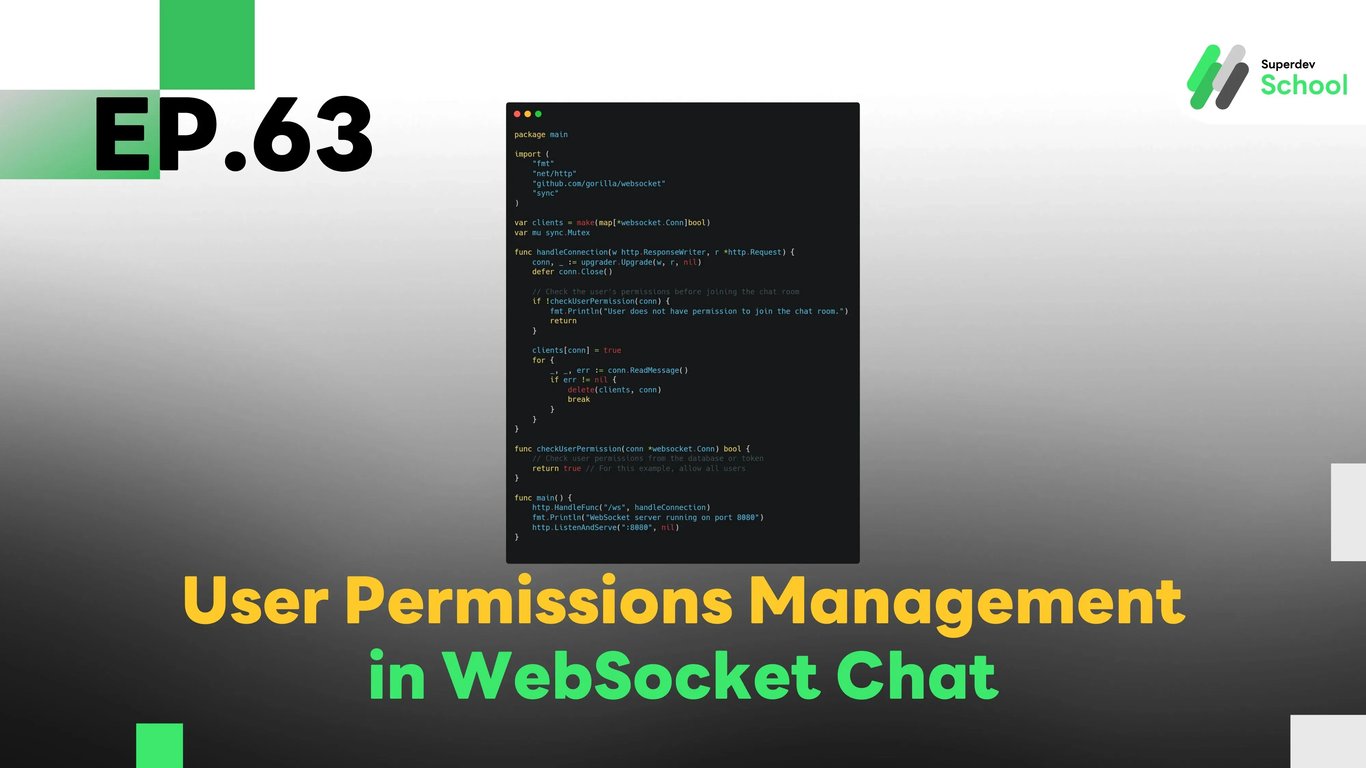
Adding User Permissions Management Feature in WebSocket Server
package main

import (
    "fmt"
    "net/http"
    "github.com/gorilla/websocket"
    "sync"
)

var clients = make(map[*websocket.Conn]bool)
var mu sync.Mutex

func handleConnection(w http.ResponseWriter, r *http.Request) {
    conn, _ := upgrader.Upgrade(w, r, nil)
    defer conn.Close()

    // Check the user's permissions before joining the chat room
    if !checkUserPermission(conn) {
        fmt.Println("User does not have permission to join the chat room.")
        return
    }

    clients[conn] = true
    for {
        _, _, err := conn.ReadMessage()
        if err != nil {
            delete(clients, conn)
            break
        }
    }
}

func checkUserPermission(conn *websocket.Conn) bool {
    // Check user permissions from the database or token
    return true // For this example, allow all users
}

func main() {
    http.HandleFunc("/ws", handleConnection)
    fmt.Println("WebSocket server running on port 8080")
    http.ListenAndServe(":8080", nil)
}
In this example code, we check the user's permissions before allowing them to join the chat room.
Challenge!
Try adding Private Room Settings to allow users to set their chat room to private, limiting access to authorized users only.
Next EP:
In EP.64, we will dive into Error Handling in WebSocket Server with Golang to ensure that our WebSocket system can handle errors effectively and maintain resilience during unexpected situations.