07/06/2026 06:43am
EP.77 Building an Instant Notification System with WebSocket
#Real-Time Messaging
#Instant Notification
#Golang
#Go
#real-time alerts
#notification system
#WebSocket
In this episode, you’ll learn how to build an Instant Notification System using WebSocket, allowing users to receive real-time alerts whenever there’s a new message, event, or activity in your chat application or other real-time platforms.
We’ll be using Golang to build a WebSocket server that can:
- Broadcast notifications to all connected clients
- Or send targeted notifications to specific users
We'll also provide sample code for both server and client to help you understand the full real-time flow.
🔸 Why Use an Instant Notification System?
1. Improved User Experience:
Users get notified about important events instantly, without refreshing or polling the app.
2. Real-Time Communication:
WebSocket enables bi-directional communication between client and server, making real-time delivery seamless.
3. Scalable for Multiple Users:
The system can handle broadcasting messages to multiple users simultaneously without heavy performance loss.
🔸 System Architecture Overview
- Server:
Receives events or messages and pushes notifications to clients via WebSocket - Client:
Listens for incoming notifications and displays them instantly via UI
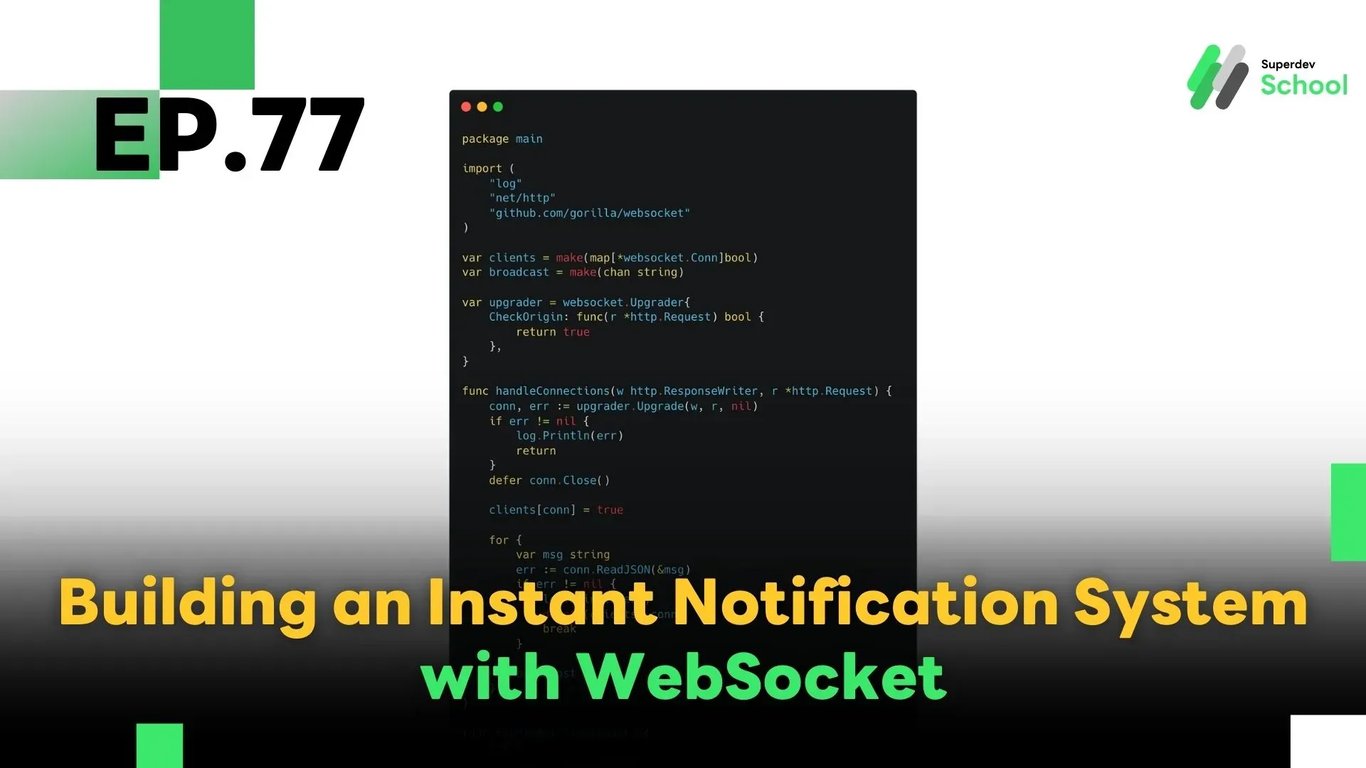
✅ Sample WebSocket Server (Golang)
package main

import (
    "log"
    "net/http"
    "github.com/gorilla/websocket"
)

var clients = make(map[*websocket.Conn]bool)
var broadcast = make(chan string)

var upgrader = websocket.Upgrader{
    CheckOrigin: func(r *http.Request) bool {
        return true
    },
}

func handleConnections(w http.ResponseWriter, r *http.Request) {
    conn, err := upgrader.Upgrade(w, r, nil)
    if err != nil {
        log.Println(err)
        return
    }
    defer conn.Close()

    clients[conn] = true

    for {
        var msg string
        err := conn.ReadJSON(&msg)
        if err != nil {
            log.Println(err)
            delete(clients, conn)
            break
        }

        broadcast <- msg
    }
}

func handleNotifications() {
    for {
        msg := <-broadcast
        for client := range clients {
            err := client.WriteJSON(msg)
            if err != nil {
                log.Println(err)
                client.Close()
                delete(clients, client)
            }
        }
    }
}

func main() {
    http.HandleFunc("/ws", handleConnections)
    go handleNotifications()

    log.Println("WebSocket Notification Server started on :8080")
    log.Fatal(http.ListenAndServe(":8080", nil))
}
✅ Sample Client (JavaScript)
const socket = new WebSocket("ws://localhost:8080/ws");

// Receive notification
socket.onmessage = function(event) {
    const message = event.data;
    console.log("📢 Notification Received:", message);
    // You can update UI with the notification here
};

// Send test message
function sendNotification(msg) {
    socket.send(JSON.stringify(msg));
}
🧪 How to Test the System
- Start the Go WebSocket server
- Connect multiple clients (e.g., open browser tabs)
- Send notification messages from any client
- Verify that all connected clients receive the message in real time
💡 Tips & Best Practices
- ✅ Use targeted notifications for specific users to avoid unnecessary broadcasts
- ✅ Limit the number of messages per second to prevent server overload
- ✅ Integrate with Redis Pub/Sub if you need to scale WebSocket across multiple server instances
🔜 Coming Next in EP.78:
Scaling WebSocket Servers with Kubernetes
In the next episode, we’ll show you how to deploy and scale your WebSocket server using Kubernetes, enabling you to handle thousands of concurrent connections reliably.
Read more
🔵 Facebook: Superdev School (Superdev)
📸 Instagram: superdevschool
🎬 TikTok: superdevschool
🌐 Website: www.superdev.school